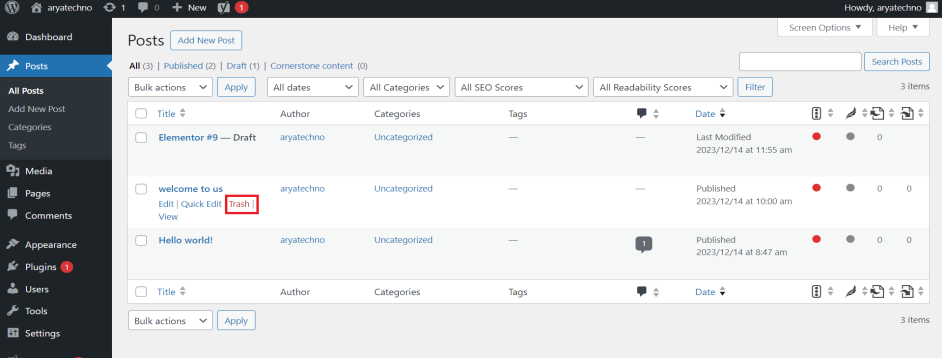
Deleting posts in WordPress is a straightforward process. Here's a step-by-step guide on how to delete posts:
-
Login to Your WordPress Dashboard:
- Access your WordPress admin area by adding
/wp-adminto your website's URL and logging in.
- Access your WordPress admin area by adding
-
Go to the Posts Section:
- In the WordPress dashboard, click on "Posts" in the left-hand menu to access the list of your existing posts.
-
Find the Post to Delete:
- Locate the post you want to delete from the list. You can use the search or filter options to narrow down the list.
-
Hover Over the Post Title:
- Hover your mouse over the title of the post you want to delete. This will reveal additional options.
-
Click on "Trash":
- After hovering, you'll see a set of options, including "Trash." Click on the "Trash" option. This action moves the post to the trash.
-
Empty the Trash (Optional):
- If you want to permanently delete the post, you need to go to the "Trash" section and empty it. Click on "Trash" in the left-hand menu, select the post you want to permanently delete, and click "Delete Permanently."
Additional Tips:
-
Bulk Delete:
- If you have multiple posts you want to delete, you can use the bulk actions feature. Check the boxes next to the posts you want to delete, select "Move to Trash" from the bulk actions dropdown, and click "Apply."
-
Restore from Trash:
- If you accidentally moved a post to the trash, you can restore it by going to the "Trash" section, selecting the post, and clicking "Restore."
-
Permanent Deletion:
- When you delete a post, it goes to the trash first, allowing for recovery. To permanently delete a post, you must empty the trash.
-
Custom Post Types:
- If your WordPress site uses custom post types, the process for deleting posts within those types is similar.


Comments